PowerBI
Destinet/Exposer has the capablity to show PowerBI embeded reports on its web, intranet and Exposer channels. This page shows the requirements and the procedure on how to set it up.
Subscription types
PowerBI Azure app registration
Next you need to Register an PowerBI Azure "App". When registering an PowerBI Azure "app" it will generate a client/secret we need to generate embed access tokens from PowerBI:
- Go to "https://app.powerbi.com/embedsetup/UserOwnsData"
- Select "Sign in with your PowerBI admin account".
- As "App Name" velg "Destinet".
- Select "App type" "Server-side Web app".
- In "Redirect URL" insert "https://accounts.destinet.no/auth/identity/gateway".
- In permissions check all boxes that give read rights.
You should now have recived "Client ID", "Client Secret" and Tenant-ID.
Create a PowerBI Pro user
Destinet/Exposer communicates with PowerBI using a PowerBI Pro user token. The permissions for what Workspace, and the reports and dashboard in that Workspace, Destinet/Exposer has access to is based on the permissions that user has. That user needs to have admin access to the Workspaces it wants to embed reports and dashboards from. We therefore recommended that you create a seperate PowerBI Pro user that only have access to specific Workspaces.
Destinet PowerBI module
Destinet/Exposer supports embedding PowerBI reports and dashboards. To enable the PowerBI embed module first you need to buy the PowerBI addon in Destinet Market. The PowerBI module should then be available.
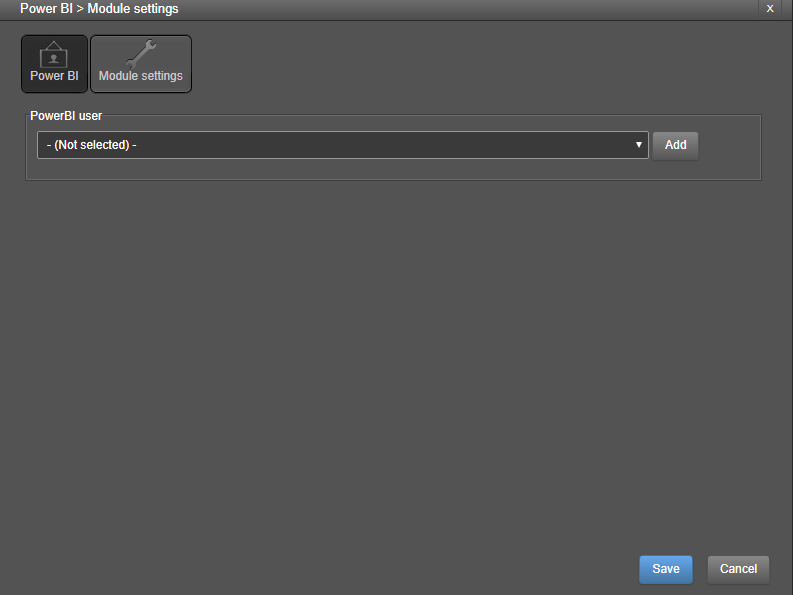
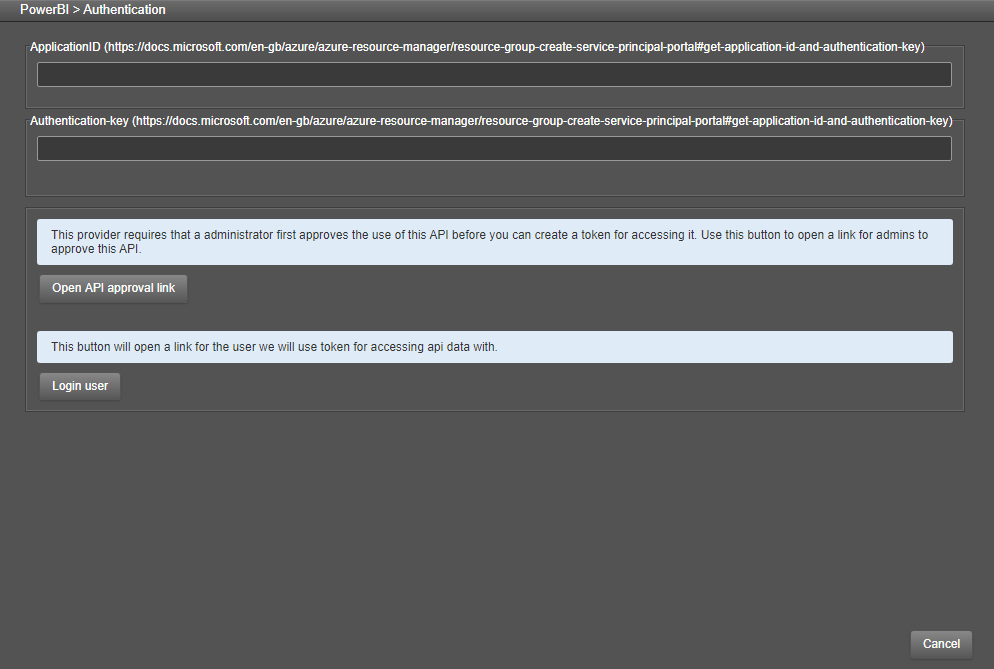
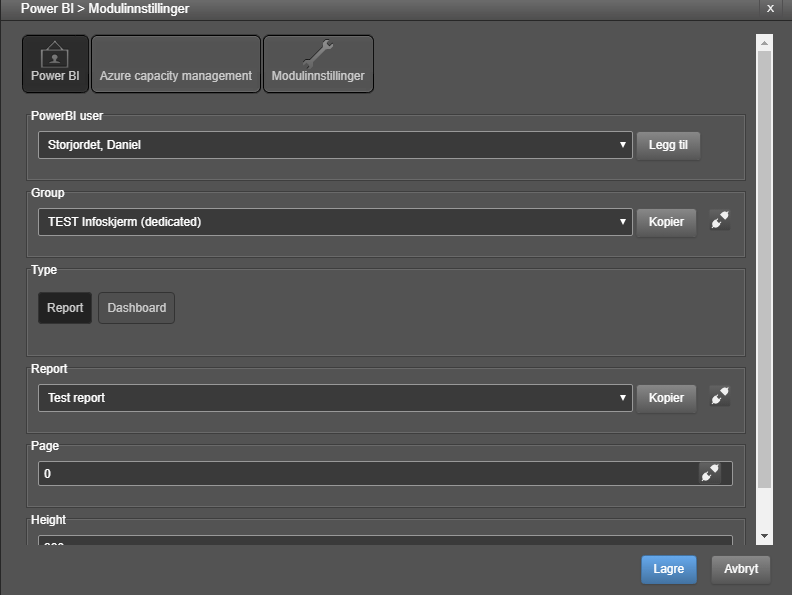
First you need to create a "Destinet Power BI user". A "Destinet Power BI user" is a generated user from doing a OAuth login agains a specific Power BI user using the Application ID and Client secret generated for the PowerBI Azure App.
This is done in two phases. First, the PowerBI Azure App needs to be approved by a admin user. This is done with the Open API approval link button. This will open a new browser window and you should proceed by logging in with a admin user.
Next you need to use the "Login user" button to login with the specific user that has the access rights limited to the usage for this integration only. This process will generate the user we will use. After this process you can reenter the PowerBI module to select the new user.
Next you need to have "Dedicated capacity" enabled on the report and dashboard workgroups. "Dedicated capacity" is a virtual server running in Azure that will generate your reports and dashboard for use outside PowerBI and allow other application to embed the results.
You can find a full list of the different capcity of the virtual servers and their price here:
https://azure.microsoft.com/en-us/pricing/details/power-bi-embedded/
PowerBI Premium comes default with a A4 SKU virutal server. For information about managing your dedicated capacity in PowerBI Premium go here:
https://docs.microsoft.com/en-us/power-bi/service-admin-premium-manage
If you do not have premium you need to atleast rent a A1 SKU to allow permanent embedding.
Rent A1 SKU for PowerBI Pro
Reduce dedicated capacity cost
You pay for the time the A1 SKU is up and running. There is an option to pause your SKU subscription in the Azure Portal.
Destinet has an option to automatically pause the capacity inbetween use. To do so Destinet will need the following:
- Azure mangement "App" registration
- Generate a access/refreshtoken to a Azure Capacity admin user
To make a Azure management "App" an admin will have to login to Azure Portal and upgrade our PowerBI azure app to include "Azure service management" user_impersonation permissions. The following video example show how to add that permission to the existing PowerBI Azure App.
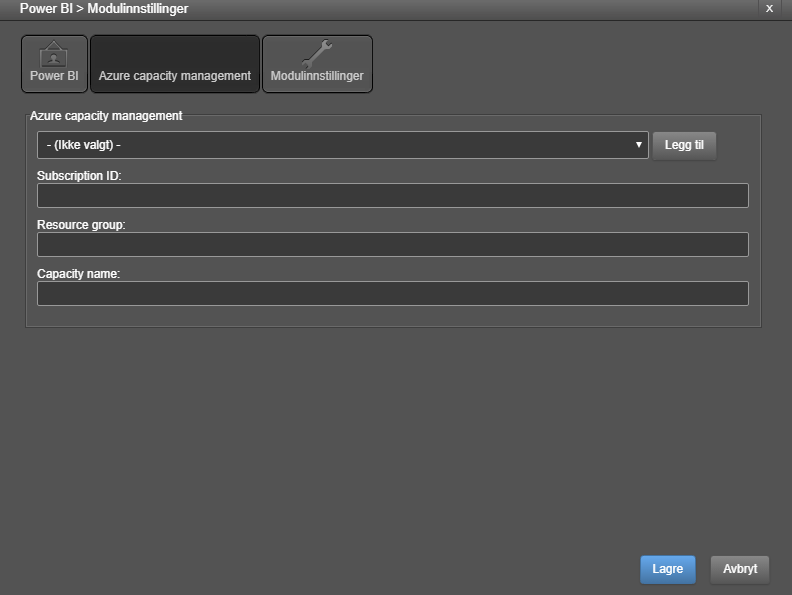
Then we need to generate a Destinet Azure user token. This is done in the PowerBI module, under "Azure capacity management" tab.
Click "Add" to open Authentication settings. As we used the same PowerBI Azure app you can use the same Application ID and Client secret. Then select Login user to go to the Microsoft Login and login as a admin user who has capacity management permissions.
You can then go back in to the Destinet PowerBI module to select the new user.
You also need to specify the Subscription ID, Resource group and Capacity name of the capacity you wish to automatically start/stop on demand.
Assign dedicated capacity to workgroup